EaseUS Data Recovery Wizard for Mac

Recover Lost Data from your Mac OS X or macOS Computer in Minutes
Losing data from your Mac is not a pleasant experience to go through, and the problem is that data can be lost in numerous ways. You might have accidentally formatted your disk or deleted data that you didn’t realize you would need later on, your system might have crashed, preventing you from accessing your hard drives, or it could be some external storage device that you’re unable to retrieve data from. Whatever the case, there are several third-party software solutions for your issue. The one we’re reviewing today is EaseUS Data Recovery Wizard for Mac, one of the most well-known products in this category. This pro data recovery utility is simple enough for newbies to try and powerful enough for experts to rely on as a must-have recovery tool.
Software Overview
EaseUS Data Recovery Wizard for Mac has you covered no matter how you lost your data or where you lost it from. It works with a wide range of storage devices including iPods, camcorders, memory cards, hard drives, SD cards, digital cameras, and digital video recorders. It is also able to retrieve an impressive array of file formats for documents, photos, videos, music, and other digital content. It can even restore lost emails, IPA files, DMG disk image files, archive files and so on.
Another massive advantage that EaseUS Data Recovery Wizard for Mac has over other products in this category is the user interface. The clean, intuitive controls in the software make it easy to use even if you don’t have any prior experience. For quick reference, here are some of the top features of this robust software:
- Recover under various conditions – formatted disk, accidentally deleted data, no backup, hard drive corrupted, system crash, unable to boot, etc.
- Recover from practically any drive or storage device – memory cards, USB drives, hard drives, Mac notebooks, iMac, etc.
- Recover lost data from Time Machine
- Create bootable USB if your computer can’t boot up normally
- Supports HFS compressed file recovery
- Supports multiple file systems – HFS+, APFS, HFS X, FAT, exFAT and NTFS
- More recoverable file formats added with each iteration
- Smooth and intutive UI (user interface)
- Available in 11 different languages
Review of EaseUS Data Recovery Wizard for Mac
When downloading EaseUS Data Recovery Wizard for Mac, make sure you get a genuine copy from the official EaseUS website. The software can be installed by double-clicking the downloaded DMG file and dragging the program icon into the Applications folder. Follow the on-screen steps to finish installing the software. You can download the free trial version, which will allow you to recover a limited amount of data, or you can just buy the license and download the full version. The download, installation and registration processes are straightforward so you shouldn’t have any problems getting it up and running.
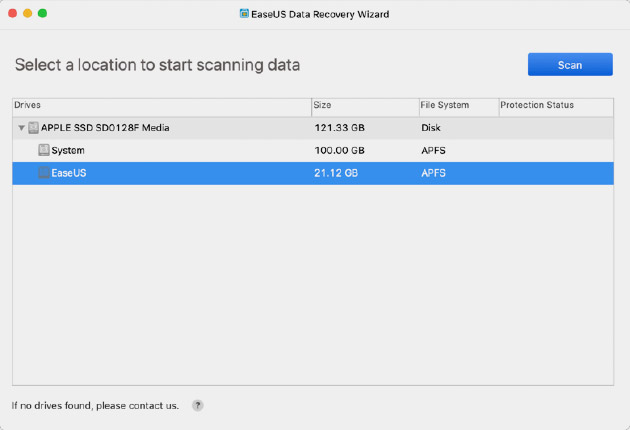
The first thing we noticed in the updated version 11.9 of the software is that the user interface has been optimized for an even better experience. All you’ll see is a window with a list of all identified drives and partitions, their size, what type of file system they have and what their protection status is, if any. If you need to recover from external drives or cards, make sure they’re connected so that it appears on that list. Once you select the location from where the data needs to be recovered, hit the Scan button. A deep scan will follow, and in the results page that is displayed, you will be able to see all the data that can be recovered from that location. The file types are neatly organized into categories for easy reference.
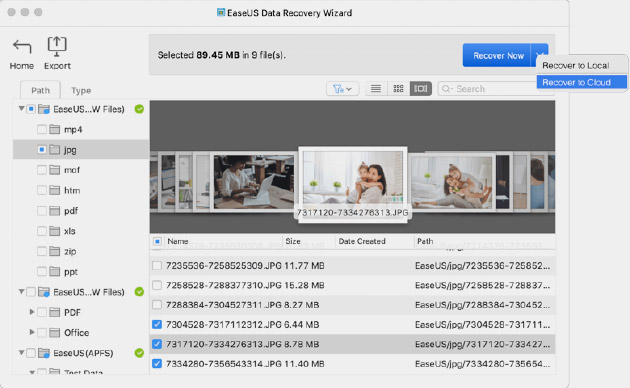
You can now preview most media and file types in the main panel and make your selection for what you want to recover. Use the default settings to recover everything from that location. This steps allows the user to pick and choose the items they want to recover, as well as preview the items to confirm their recovery.
The next step is the recovery process itself, and there are two ways to do this. You can either save the recovered files on your local hard drives or a USB flash drive, or you can choose to directly upload to a cloud service of your choice in a secure manner. Click on Recover Now to select local or cloud, specify the location or service and begin the recovery process.
At this point, it’s good to mention that the scanning and recovery processes take the longest because they are complex tasks. If you are unable to complete a full scan, you can save a copy of the progress by exporting it as a .rsf file. At a later time, you can use the Import function to bring the scanning results and resume scanning the same location. That means saving time because the same sectors won’t be scanned again.
After the recovery is done, you can navigate to the location you specified and either make a backup of those files (recommended) or keep them in storage on the cloud. There are redundancies built into cloud services like Drive and Dropbox that will make sure your data doesn’t get lost again.
On a final note, we found that the EaseUS software stood up to its reputation of being a slick yet reliable tool that was very thorough while scanning as well as recovering obscure types of content. The additional tools like Disk Monitor and Data Protection offer a more holistic and proactive solution to protect your data and prevent loss in the first place.
Data recovery is a tough job, and very few software applications make it through the often rigorous testing done by reviewers. With EaseUS, you get the feeling of working in a pro environment capable of handling intricate recovery tasks. You might see the occasional hiccup or glitch, but nothing that would be a deal-breaker if you’re considering using this software. Try the free version to get a feel of the UI, then invest in a lifetime license if you think it’s worth upgrading to premium.
Check out this EaseUS review to find out more about its features and best alternatives.